Model Trainings
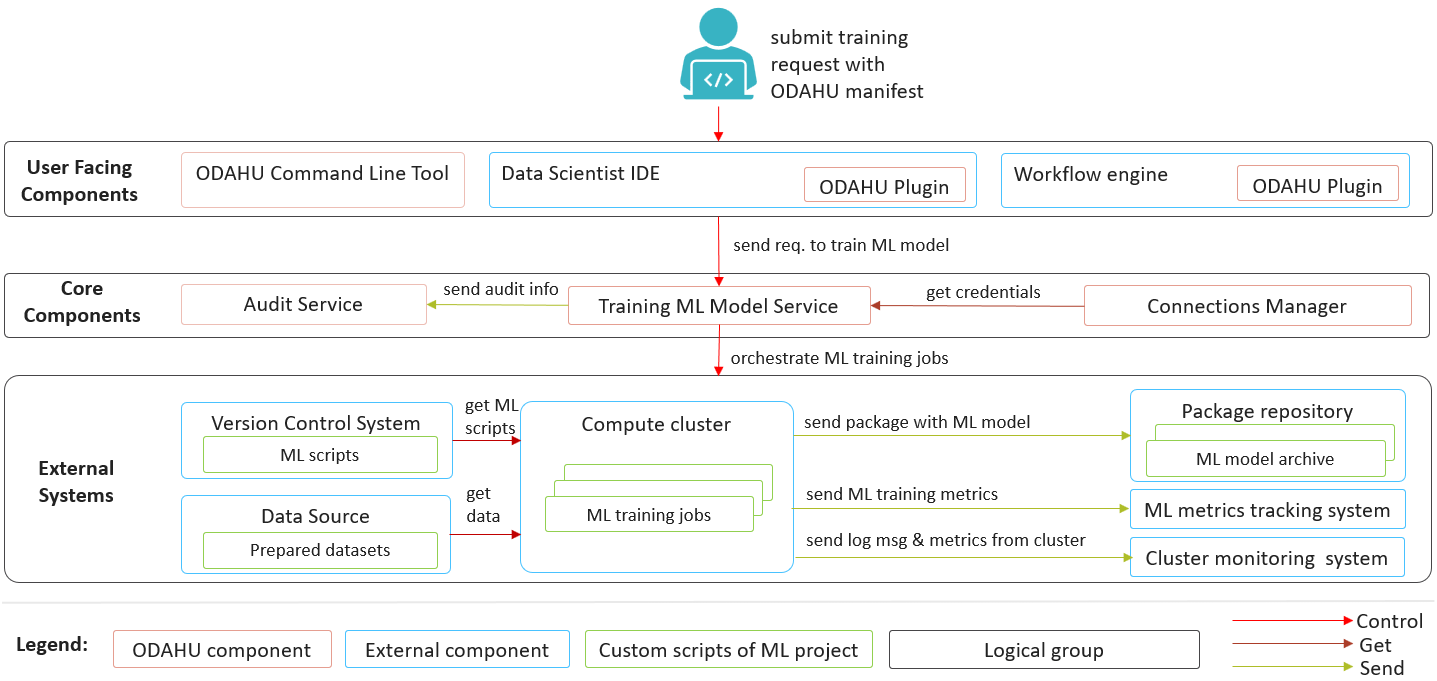
ODAHU model training component helps to automate ML model training jobs execution in K8S. The primary goal of model training component is to create a Trained Model Binary for a Packager. The API is pluggable and can be extended for different ML frameworks.
You can find the list of out-of-the-box trainers below:
General training structure
kind: ModelTraining
# Some unique value among all trainings. if not, the training with the same name will be overwritten.
# Id must:
#  * contain at most 63 characters
#  * contain only lowercase alphanumeric characters or ‘-’
#  * start with an alphanumeric character
#  * end with an alphanumeric character
id: wine-12345
spec:
  model:
    # Human-readable model name
    name: wine
    # Human-readable model version
    version: 3.0
    # Optionally, you can specify template for output artifact
    # The default value is {{ .Name }}-{{ .Version }}-{{ .RandomUUID }}.zip
    # where:
    #   Name - spec.model.name
    #   Version - spec.model.version
    #   RandomUUID - a random UUID v4, for example be17d12d-df43-4588-99e7-56a0db3cad77
    artifactNameTemplate: {{ .Name }}-{{ .Version }}-{{ .RandomUUID }}.zip
  # The toolchain parameter is a point of extension for different ML frameworks.
  # For now, we only support the Mlfow toolchain
  toolchain: mlflow
  # Mlflow MLProject file contains the list of entrypoints. You must choose one of those.
  entrypoint: main
  # Working directory inside a training (docker) container, which GIT repository copied in.
  # Optional. The default directory is "./".
  workDir: work/dir
  # The training data for a ML script. You can find full description there: https://docs.odahu.epam.com/ref_trainings.html#training-data
  data:
      # You can specify a connection name
    - connection: wine
      # Path to a file or a dir where data will copy from a bucket; relative to your Git repository root derictory.
      localPath: mlflow/wine-quality/
      # Path to the dir or file in a bucket
      # Optional. If it is missing then the path from connection will be used.
      remotePath: training-data/
  # You can specify the map of hyperparameters
  hyperParameters:
    key: value
    var2: test
  # Compute resources for the training job.
  resources:
    limits:
      cpu: 1
      memory: 1Gi
    requests:
      cpu: 1
      memory: 1Gi
  # Custom environment variables that should be set before entrypoint invocation.
  envs:
      # The name of variable
    - name: TEST_ENV_KEY
      # The value of variable
      value: TEST_ENV_VALUE
  # A Docker image where the training will be launched.
  # By default, the image from a toolchain is used.
  image: python:3.8
  # A section defining training source code
  algorithmSource:
    # Use vcs if source code located in a repository and objectStorage if in a storage. Should not use both
    vcs:
      # A connection which describes credentials to a GIT repository or to a bucket if using objectStorage
      connection: <git-connection>
      # Git reference (branch or tag)
      # This must be specified here OR in Git connection itself
      # In case of using objectStorage, specify path: <remote path> instead of reference
      reference: master
  # You can set a connection that points where the Trained Model Binary will be stored.
  # Optional. Default value is taken from the ODAHU cluster configuration.
  outputConnection: custom-connection
  # Node selector that exactly matches a node pool from ODAHU config
  # This is optional; when omitted, ODAHU uses any of available training node pools
  # Read more about node selector: https://kubernetes.io/docs/concepts/scheduling-eviction/assign-pod-node/
  nodeSelector:
    label: value
status:
  # One of the following states: scheduling, running, succeeded, failed, unknown
  state: running
  # List of training results
  artifacts:
      # Mlflow run ID
    - runId: 12345678
      # Trained artifact name
      artifactName: wine-10.zip
      # VCS commit ID
      commitID: d3d6e8ed776ed37fd2efd7a1b8d5fabdd7e3eea5
Training data
Odahu-flow allows downloading data from various sources to the local file system of a training job. Data source supports the following types of Odahu-flow connections:
Let’s consider the following example of downloading training data from Google Cloud Storage.
- Prerequisites:
- The training data set is located in the wine-training-data bucket by wine/11-11-2011/ directory.
- The ML script expects that the data will be located in the training (docker) container by data/ directory relative to the root git directory.
First of all, we should create an Odahu-flow GCS connection.
kind: ModelTraining
id: "wine-training-data-conn"
spec:
    type: gcs
    uri: gsc://wine-training-data/
    keySecret: '{"type": "service_account", "project_id": "project_id", "private_key_id": "private_key_id", "private_key": "-----BEGIN PRIVATE KEY-----\nprivate_key\n-----END PRIVATE KEY-----\n", "client_email": "test@project_id.iam.gserviceaccount.com", "client_id": "123455678", "auth_uri": "https://accounts.google.com/o/oauth2/auth", "token_uri": "https://oauth2.googleapis.com/token", "auth_provider_x509_cert_url": "https://www.googleapis.com/oauth2/v1/certs", "client_x509_cert_url": "https://www.googleapis.com/robot/v1/metadata/x509/test@project_id.iam.gserviceaccount.com"}'
    description: "Training data for a model"
    region: us-central2
Finally, we provide a data section of Model Training.
spec:
  data:
    - connection: wine-training-data-conn
      localPath: data/
      remotePath: wine/11-11-2011/
GPU
Odahu-flow supports model training on GPU nodes.
You can find more about GPU deployment configuration in the installation guide.
In order to provision a training container in the GPU node pool, you must specify the GPU resource in the model training manifest.
kind: ModelTraining
id: gpu-model
spec:
  resources:
    limits:
      cpu: 1
      memory: 1Gi
      gpu: 1
    requests:
      cpu: 1
      memory: 1Gi
NVIDIA libraries will be mount by ODAHU to the training container. But if you want to use a CUDA library, you should install it manually.
For example, you can add the following dependencies to a conda file: cudatoolkit-dev and cudatoolkit.
Model Dependencies Cache
ODAHU Flow downloads your dependencies on every model training launch. You can experience the following troubles with this approach:
- downloading and installation of some dependencies can take a long time
- network errors during downloading dependencies
To overcome these and other problems, ODAHU Flow provides a way to specify a prebuilt training Docker image with your dependencies.
Note
If you have different versions of a library in your model сonda file and cache container, then the model dependency has a priority. It will be downloaded during model training.
First of all, you have to describe the Dockerfile:
- Inherit from a release version of odahu-flow-mlflow-toolchain
- Optionally, add install dependencies
- Add a model conda file
- Update the
odahu_modelconda environment.
FROM odahu/odahu-flow-mlflow-toolchain:1.1.0-rc11

# Optionally
# apt-get install -y wget

ADD conda.yaml ./
RUN conda env update -n ${ODAHU_CONDA_ENV_NAME} -f conda.yaml
Build the docker image:
docker build -t training-model-cache:1.0.0 .
Push the docker image to a registry:
docker push training-model-cache:1.0.0
Specify the image in a model training:
kind: ModelTraining
id: model-12345
spec:
  image: training-model-cache:1.0.0
  ...
Trainings management
Trainings can be managed using the following ways.
Swagger UI
ModelTraining and ToolchainIntegration are available on the Swagger UI at http://api-service/swagger/index.html URL.
Odahu-flow CLI
Odahuflowctl supports the Training API. You must be logged in if you want to get access to the API.
Getting all trainings in json format:
odahuflowctl train get --format json
Getting the model name of the trainings:
odahuflowctl train get --id tensorflow-cli -o 'jsonpath=[*].spec.model.name'
- Creating a training from train.yaml file:
odahuflowctl train create -f train.yaml
- Reruning a training from train.yaml file:
odahuflowctl train edit -f train.yaml
- All training commands and documentation:
odahuflowctl train --help
We also have local training:
odahuflowctl local train --help
and can run trainings locally:
odahuflowctl local train run --id [Model training ID] -d [Path to Odahu manifest files]
more information you can find at Local Quickstart
JupyterLab
Odahu-flow provides the JupyterLab extension for interacting with Training API.
MLFlow toolchain
MLflow is library-agnostic. You can use it with any machine learning library, and in any programming language, since all functions are accessible through a REST API and CLI.
Installation
The most straightforward way to install the MLFlow trainer on an Odahu Cluster is to deploy the odahu-flow-mlflow helm chart. The helm chart registers the trainer in the API Odahu and deploys an MLflow Tracking Server. By default, the deployed MLflow Tracking Server is available at https://cluster-url/mlflow address.
# Add the odahu-flow helm repository
helm repo add odahu-flow 'https://raw.githubusercontent.com/odahu/odahu-helm/master/'
helm repo update
# Fill in the values for the chart or leave the default values
helm inspect values odahu-flow/odahu-flow-mlflow --version 1.0.0 > values.yaml
vim values.yaml
# Deploy the helm chart
helm install odahu-flow/odahu-flow-mlflow --name odahu-flow-mlflow --namespace odahu-flow --debug -f values.yaml --atomic --wait --timeout 120
Warning
Odahu-flow must be deployed before the mlflow trainer.
MLProject file
Let’s look at how the MLProject file is related to Model Training API.
name: My Project

entry_points:
  main:
    parameters:
      data_file: path
      regularization: {type: float, default: 0.1}
    command: "python train.py -r {regularization} {data_file}"
  test:
    parameters:
      data_file: path
    command: "python validate.py {data_file}"
Model Training API can contain only one entry point. You have to add all hyperparameters, which do not have a default value, to a Model Training. Next, you can find the Model Trainings for the MLProject file.
spec:
  entrypoint: main
  hyperParameters:
    data_file: test/123.txt
    regularization: 0.2
spec:
  entrypoint: main
  hyperParameters:
    data_file: test/456.txt
spec:
  entrypoint: test
  hyperParameters:
    data_file: test/123.txt
MLFlow protocol
Odahu-flow requires that a model is logged through mlflow API.
mlflow.sklearn.log_model(lr, "model")
Optionally, you can provide input and output samples for Odahu-flow. It allows determining input and output types for Odahu-flow packagers. These names must be head_input.pkl and head_output.pkl, respectively.
train_x.head().to_pickle('head_input.pkl')
mlflow.log_artifact('head_input.pkl', 'model')
train_y.head().to_pickle('head_output.pkl')
mlflow.log_artifact('head_output.pkl', 'model')
MLFlow Project toolchain
MLFlow Project toolchain is a lightweight version of MLFlow toolchain.
The main difference is that MLFlow Project toolchain does not require user to store models using MLFlow Tracking API and therefore does not require models stored in MLFlow format as a resulted artifact.
Instead, MLFlow Project toolchain relies only on MLFlow Project functionality to run training script and manage dependencies. User can store result artifacts in any format as they wish.
Installation
Installation of MLFlow Project toolchain is identical to MLFlow installation
MLProject file
MLFlow Project toolchain runs training script using MLProject specification. Please refer to previous section or official MLFlow documentation to learn more about MLProject file.
Storing training artifacts
You can store any artifacts during script execution in a special directory. To get a path to output directory read value
of $ODAHUFLOW_OUTPUT_DIR environment variable.
1 2 3 | output_dir = os.environ.get("ODAHUFLOW_OUTPUT_DIR") train_x.head().to_pickle(os.path.join(output_dir, 'head_input.pkl')) |
Additionally, if $STATIC_ARTIFACTS_DIR variable is specified with a path to directory, all the contents
is copied to final artifact. Path must be relative to working directory.
You can use this feature if you have some file(s) that are required by further steps and can be defined statically before script execution. For example, some python wrapper scripts to deploy a model into a specific ML Server in the future.