Security
Prime goals of ODAHU Security system is to provide authentication, authorization and give users a flexible access control management solution.
The first section Security overview shows the general design of authentication and authorization is described. Look at this section to have a deep understanding of how ODAHU security works under the hood or to learn basic concepts.
The second section Policies describes default security policies for different ODAHU services and how to configure them
Implementation details of ODAHU Security system could be found here
Content table
Security overview
Component roles
There are some common terms related to access control management systems. In this documentation, the next ones are commonly used.
- Identity Provider (idP)
- A component that provides information about an entity (user or service). In ODAHU the role of idP can do any OpenID Connect compatible provider.
- Policy Enforcement Point (PEP)
- A component that enforces security policies against each request to API or other protected resources. In ODAHU the role of PEP plays Envoy proxy.
- Policy Decision Point (PDP)
- A component that decides whether the request (action in the system) should be permitted or not. In ODAHU role of PDP plays OpenPolicyAgent.
API Request lifecycle
To have a better understanding of how all ODAHU security components work together let’s review the API request lifecycle and describe what is happened for each HTTP request.
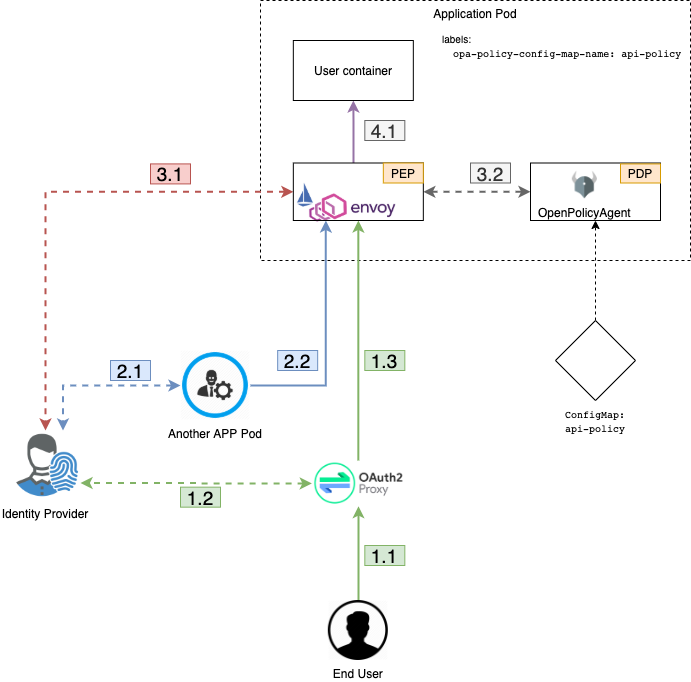
- HTTP Request could be made from the outside of the cluster perimeter.
- In this case, the request is handled by OAuth2Proxy via Kubernetes ingress controller
- OAuth2Proxy looks up cookies that contain JWT Token issued by idP. If there are no such cookies it redirects the request to idP. After successful login OAuth2Proxy set issued token to cookies (and also to) and send the request to upstream. Before proxying requests to upstream OAuth2Proxy add Authorization Request Header Field from the cookie automatically by setting it from the cookie.
- OAuth2Proxy send request to upstream.
- HTTP Request from inside the cluster perimeter. Such requests usually made by background processes inside the cluster
on behalf of service accounts.
- Service should previously authenticate in idP using OpenID Connect protocol. The most suitable way to authenticate services is OAuth2 Client Credentials Grant
- Service makes a request to API using issued JWT token as Authorization Request Header Field
- Envoy proxy as PEP that is configured as sidecar container by Istio Pilot for those ODAHU components that must be
protected ensures that security policy allows making this request to ODAHU API
- Envoy verifies JWT token in Authorization Request Header Field using JSON Web Token (JWT) Authentication filter
- Envoy makes a query to OpenPolicyAgent sidecar as PDP using External Authorization filter passing parsed JWT token from the previous step. OpenPolicyAgent sidecars are injected for all pods that have odahu-flow-authorization=enabled label
- If a request is permitted by OpenPolicyAgent, it is sent to upstream (ODAHU API)
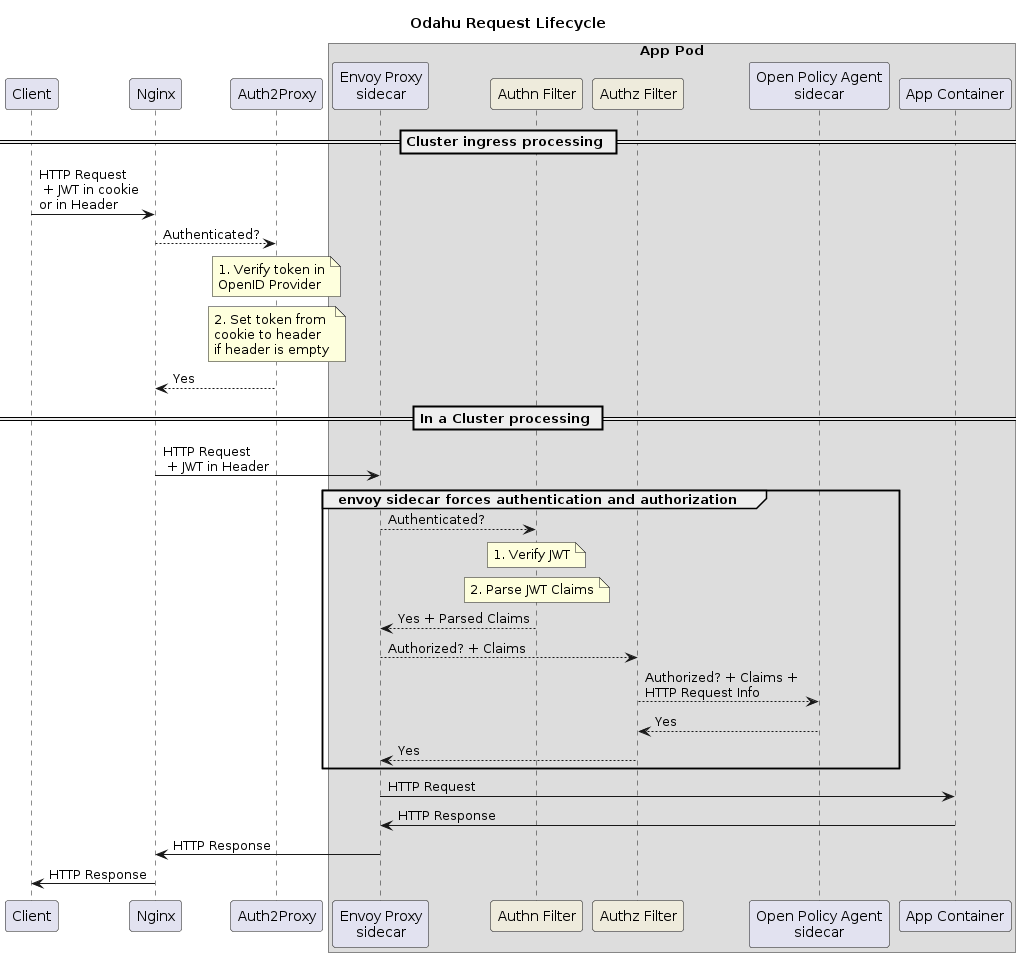
UML sequence diagram of a successful API request described above is shown in the image:
Policies
ODAHU is distributed with build-in policies that are written on Rego policy language and included into helm charts of appropriate services.
`Role-based access control`_ is implemented by default for next services
- API
- Feedback aggregator
- ODAHU deployed ML Models
ODAHU API and Feedback aggregator policies
Overview
API and Feedback aggregator are distributed with a pre-defined set of OpenPolicyAgent policies. These policies implement simple `Role-based access control`_ (RBAC).
Next features are implemented using Rego policy language:
- Set of predefined roles with assigned permissions
- Default mapper that match JWT Claims to attributes that ODAHU RBAC policy expects
- ODAHU RBAC core policy
These features are implemented in the next files:
- roles.rego – all odahu roles are listed here
- permissions.rego – permissions for roles
- input_mapper.rego – mapper to match JWT Claims to attributes ODAHU RBAC rely on. These attributes include:
- user – info about user or service who makes the request (this property contains roles attribute with a list of roles)
- action – HTTP verb of the request
- resource – URL of the request
- core.rego – core implementation of Role based access control.
All policies customization can be done on the stage of system configuration as described in installation guide
Customize
In this section, different ways to customize pre-defined policies
Extend roles
To define new custom roles, you should add them as a variable in the roles.rego file
1 2 3 4 5 6 7 8 | package odahu.roles
admin := "admin"
data_scientist := "data_scientist"
viewer := "viewer"
# new role
connection_manager := "connection_manager"
|
Then you need to set permissions to that role in file permissions.rego
1 2 3 4 5 6 7 8 9 10 11 12 13 14 15 16 17 18 19 20 21 22 23 | package odahu.permissions import data.odahu.roles permissions := { roles.data_scientist: [ [".*", "api/v1/model/deployment.*"], [".*", "api/v1/model/packaging.*"], [".*", "api/v1/model/training.*"], ["GET", "api/v1/connection.*"], ["GET", "api/v1/packaging/integration.*"], ["GET", "api/v1/toolchain/integration.*"] ], roles.admin : [ [".*", ".*"] ], roles.viewer : [ ["GET", ".*"] ], roles.connection_manager : [ [".*", "api/v1/connection.*"] ], } |
In this file, we:
- lines 20-22: add permissions to any request to api/v1/connection.* URL for a new role
Customize default mapper
You can configure mapper.rego to extend input that is passed to core.rego file with RBAC implementation
1 2 3 4 5 6 7 8 9 10 11 12 13 14 15 16 17 18 19 20 21 22 23 24 25 26 27 | package odahu.mapper import data.odahu.roles roles_map = { "odahu_admin": roles.admin, "odahu_data_scientist": roles.data_scientist, "odahu_viewer": roles.viewer } jwt = input.attributes.metadata_context.filter_metadata["envoy.filters.http.jwt_authn"].fields.jwt_payload keycloak_user_roles[role]{ role = jwt.Kind.StructValue.fields.realm_access.Kind.StructValue.fields.roles.Kind.ListValue.values[_].Kind.StringValue } user_roles[role]{ role = roles_map[keycloak_user_roles[_]] } parsed_input = { "action": input.attributes.request.http.method, "resource": input.attributes.request.http.path, "user": { "roles": user_roles } } |
In this file, we:
- lines 5-9: map roles from jwt claims to policies roles from roles.rego
- lines 11-19: extract roles from claims and match them to policies roles
- lines 21-26: create input that is expected by file core.rego that contains resource, action and user’s roles
Create custom policies
If `Role-based access control`_ is not enough for your purposes you can customize policies to use more general `Attribute-based access control`_. For this purpose, rewrite core.rego file or create your own rego policies from scratch
1 2 3 4 5 6 7 8 9 10 11 12 13 14 15 16 17 18 19 20 21 22 23 24 25 26 | package odahu.core import data.odahu.mapper.parsed_input import data.odahu.permissions.permissions default allow = false allow { any_user_role := parsed_input.user.roles[_] any_permission_of_user_role := permissions[any_user_role][_] action := any_permission_of_user_role[0] resource := any_permission_of_user_role[1] re_match(action, parsed_input.action) re_match(resource, parsed_input.resource) } allow { parsed_input.action == "GET" parsed_input.resource == "/" } allow { parsed_input.action == "GET" re_match("/swagger*", parsed_input.resource) } |
In this file, we:
- lines 8-16: allow access if there are required permissions for action and resource for at least one user’s roles
- lines 18-21: allow access to root for any user
- lines 23-26: allow access to swagger docs to any user
ODAHU ML Models pods policies
All deployed models contain default policies that permit requests to them for all users that have Model Deployment Access Role Name. This role can be set at the model deployment stage using .Spec.roleName key of the ModelDeployment manifest and also statically configured in policies during ODAHU deployment.